How-to
How to Screenshot on Mac: The Complete 2026 Guide

Taking a screenshot on a Mac has never been easier, and knowing how to screenshot on Mac can save time and boost productivity. Whether you want to capture the entire screen, a specific window, or just a selected portion, macOS provides simple and powerful shortcuts. With tools like the Screenshot toolbar, floating thumbnail previews, and options to save or copy to clipboard, you can quickly organize and edit your captures. From Touch Bar screenshots to screen recording features, mastering these techniques ensures you never miss important content. Learn step-by-step methods to take, edit, and manage Mac screenshots efficiently
In this ultimate guide, we’ll explore everything you need to know about screenshots on Mac, including shortcuts, built-in apps, editing options, third-party tools, troubleshooting, and pro tips.
Why Screenshot on Mac
Screenshots are more than just quick images. They serve multiple purposes:
- Work productivity: Capture and share important documents, emails, or notes.
- Design inspiration: Save ideas from websites, apps, and software.
- Education & tutorials: Create step-by-step guides or training material.
- Tech support: Share error messages or configurations with IT teams.
- Personal use: Save receipts, social media posts, or memorable moments.
On a Mac, taking screenshots is quick, versatile, and highly customizable.
Methods to Take Screenshots on Mac
Apple gives you multiple ways to take screenshots, each designed for different needs. Let’s dive into the options:
1. Capture the Entire Screen
Shortcut: Command (⌘) + Shift + 3

This captures everything on your screen and saves it as an image file.
- Where it saves: By default, the screenshot is saved on your desktop with the file name “Screenshot [date] at [time].png.”
- When to use: Useful when you want a full view—presentations, meetings, or recording everything happening on your display.
2. Capture a Portion of the Screen
Shortcut: Command (⌘) + Shift + 4
When you press this combination, your mouse pointer turns into a crosshair.

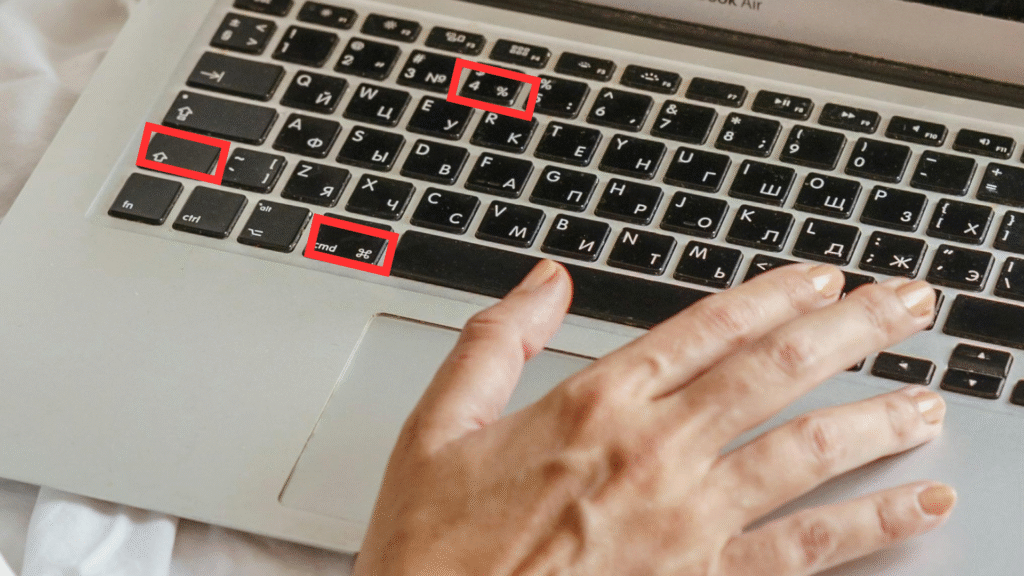
- Step 1: Drag the crosshair to select the area you want to capture.
- Step 2: Release the mouse or trackpad to take the screenshot.
Pro Tip: If you hold the Spacebar after dragging, you can move the selection box around.
3. Capture a Specific Window
Shortcut: Command (⌘) + Shift + 4 + Spacebar
This is perfect if you only want to capture a particular window (like Safari, Finder, or an app).
- After pressing the keys, your pointer becomes a camera icon.
- Move the camera over the window you want to capture.
- Click once, and macOS will screenshot only that window.
The result includes a subtle shadow effect for better aesthetics.
4. Screenshot Menu with Preview Options
Shortcut: Command (⌘) + Shift + 5

This opens the Screenshot Toolbar, which is one of the most powerful features in macOS.
Screenshot Toolbar (⌘ + Shift + 5)
- Inline improvements to add:
- Screen recording tip: “The Screenshot toolbar also lets you record your screen either the entire display or a selected area.
- Save location tip: “You can change the default save location directly from the toolbar.”
- Clipboard tip: “Hold the Control key while capturing to copy the screenshot to your clipboard for quick pasting into documents or emails.”
5. Capture the Touch Bar (for Macs that have it)
Shortcut: Command (⌘) + Shift + 6
If you’re using an older MacBook Pro with a Touch Bar, you can capture its contents with this shortcut.
Where Do Screenshots Save on Mac?
By default, screenshots are saved to your Desktop. However, you can change the save location.
- Press Command (⌘) + Shift + 5.
- In the options menu, select your preferred folder (Desktop, Documents, Clipboard, Mail, Messages, or Preview).
- You can even set a custom folder for all screenshots.
Editing Screenshots Instantly
macOS allows you to edit screenshots right after taking them:
Suggest adding visuals of the floating thumbnail with annotations.
Copying Screenshots to Clipboard
If you don’t want a file saved on your computer and prefer pasting the screenshot directly into an app (like Word, PowerPoint, or Photoshop), you can:
- Hold Control while using a screenshot shortcut.
- For example: Command (⌘) + Control + Shift + 3 captures the entire screen and copies it to the clipboard.
- Paste it anywhere using Command (⌘) + V.
Using Preview to Take Screenshots
The Preview app also lets you capture screenshots.
Steps:
- Open Preview.
- From the top menu, select File > Take Screenshot.
- Choose from:
- From Selection
- From Window
- From Entire Screen
This is useful for those who prefer menus over shortcuts.
Using QuickTime for Screen Recording
If you want to capture not just still images but also video:
- Open QuickTime Player.
- Go to File > New Screen Recording.
- Choose whether to record the full screen or part of it.
This is great for tutorials, demos, or presentations.
Third-Party Screenshot Tools for Mac
Although macOS’s built-in features are excellent, some users prefer third-party apps
While macOS provides built-in screenshot tools, optional apps like Snagit or CleanShot X can offer advanced features for advanced options.
1. Snagit
- Paid but powerful.
- Advanced editing, scrolling capture, and templates.
2. CleanShot X
- Minimal design, cloud storage, and annotations.
- Popular among developers and writers.
3. Lightshot
- Free, lightweight, and quick sharing.
4. Skitch (by Evernote)
- Simple markup and annotation features.
Troubleshooting Common Screenshot Issues
1. Screenshots Not Saving
- Check if you accidentally changed the save location in Command (⌘) + Shift + 5.
- Make sure your desktop isn’t full or restricted.
2. Keyboard Shortcuts Not Working
- Go to System Settings > Keyboard > Shortcuts > Screenshots and ensure they’re enabled.
3. Poor Image Quality
- By default, screenshots are saved in PNG format, which is high-quality. If you converted to JPG, quality might drop.
Third-party apps like https://screen.studio
Pro Tips for Better Screenshot Management
- Change Default Format:
- Use Terminal to change from PNG to JPG, TIFF, or PDF. Example:
defaults write com.apple.screencapture type jpg killall SystemUIServer
- Use Terminal to change from PNG to JPG, TIFF, or PDF. Example:
- Organize Automatically:
- Create a “Screenshots” folder and set it as the default save location.
- Take Screenshots with Siri:
- Just say: “Hey Siri, take a screenshot.”
- Use Multiple Displays:
- On multi-monitor setups, Command (⌘) + Shift + 3 captures all screens.
Final Thoughts
Taking screenshots on a Mac is incredibly flexible. Whether you’re capturing the full screen, a small selection, or recording video tutorials, macOS has you covered with intuitive shortcuts and built-in tools. Add in third-party apps, and the possibilities are endless.
By mastering these techniques, you’ll save time, boost productivity, and make your workflow much smoother.
Frequently Asked Questions (FAQ)
Q1: Can I take a screenshot on Mac without the keyboard?
Yes, open the Screenshot Toolbar using Launchpad > Other > Screenshot.
Q2: How do I take a scrolling screenshot on Mac?
Mac doesn’t support this natively, but apps like Snagit or CleanShot X can.
Q3: How do I change where screenshots are saved?
Press Command (⌘) + Shift + 5, click Options, and select your save location.
Q4: Can I schedule screenshots on Mac?
Not natively. But third-party tools like Snagit or Automator scripts can do it.
Q5: Why are my screenshots blurry when shared?
This usually happens if the platform compresses images (e.g., WhatsApp or Slack). Use PNG for best clarity.
For more guide please visit these articals