
How-To Tutorials & Troubleshooting
How to Delete a Facebook Account: A Complete Step-by-Step Guide
Introduction
Facebook is one of the largest social media platforms in the world, connecting billions of people. For more than a decade, it has been a place where users share their life updates, connect with friends, run businesses, and even build careers. But in recent years, many users have become concerned about issues like privacy, mental health, time management, and data security. These concerns have led many people to ask a simple question: “How do I delete my Facebook account?”
Deleting a Facebook account is not just about clicking a single button—it involves making an important decision about your digital life. Some people want to temporarily take a break from the platform, while others want to permanently erase their online presence.
In this detailed guide, we will cover:
- The difference between deactivating and deleting your Facebook account
- Reasons why people delete Facebook
- Steps to deactivate your Facebook account
- Steps to permanently delete your Facebook account
- How to back up your data before deleting Facebook
- What happens after deletion
- Tips to move forward without Facebook
Why Do People Delete Facebook?
Before we jump into the steps, let’s understand why many people are saying goodbye to Facebook.
1. Privacy Concerns
Facebook has faced multiple controversies over data leaks and unauthorized sharing of user information. For people who value privacy, permanently deleting an account is often the safest option.
2. Mental Health and Wellbeing
Scrolling endlessly through social media can increase anxiety, depression, and feelings of loneliness. Many studies show that reducing time on platforms like Facebook can lead to improved mental health.
3. Productivity Issues
Facebook can be addictive. Hours slip away while scrolling through videos, memes, and news feeds. Deleting the account helps many users reclaim focus and productivity.
4. Too Much Negativity
From political arguments to fake news, Facebook has become a stressful place for some people. Deleting an account offers peace of mind.
5. Moving to Other Platforms
Some users prefer other apps like Instagram, TikTok, or LinkedIn, and see no point in maintaining multiple accounts.
Deactivation vs Deletion: Know the Difference
Facebook gives you two choices: deactivation and deletion.
Deactivation
- Your account is hidden but not gone.
- People can’t see your timeline.
- You can still use Messenger.
- You can reactivate anytime by logging back in.
Deletion
- Your account and data are permanently erased.
- You lose access to Messenger.
- Photos, videos, and posts are deleted.
- You cannot recover your account after 30 days.
If you’re unsure, deactivation may be a good first step. But if you’re certain, then deletion is the final option.

How to Deactivate Your Facebook Account
Deactivation is temporary, so here’s how you can do it:
- Log in to your Facebook account.
- Click on the drop-down arrow (top-right corner of the page).
- Go to Settings & Privacy → Settings.
- In the left menu, select Your Facebook Information.
- Choose Deactivation and Deletion.
- Select Deactivate Account.
- Click Continue to Account Deactivation.
- Follow the instructions and enter your password.
Your account will be hidden until you log in again.
How to Permanently Delete Your Facebook Account
If you’re ready to leave Facebook for good, follow these steps:
- Log in to your Facebook account.
- Click the down arrow at the top right.
- Go to Settings & Privacy → Settings.
- From the left-hand menu, click Your Facebook Information.
- Select Deactivation and Deletion.
- Choose Delete Account.
- Click Continue to Account Deletion.
- Review the information and click Delete Account.
- Enter your password and confirm.
Once you confirm, your account is scheduled for permanent deletion.
Download Your Facebook Data Before Deletion
Before deleting, you may want to save your photos, videos, and memories.
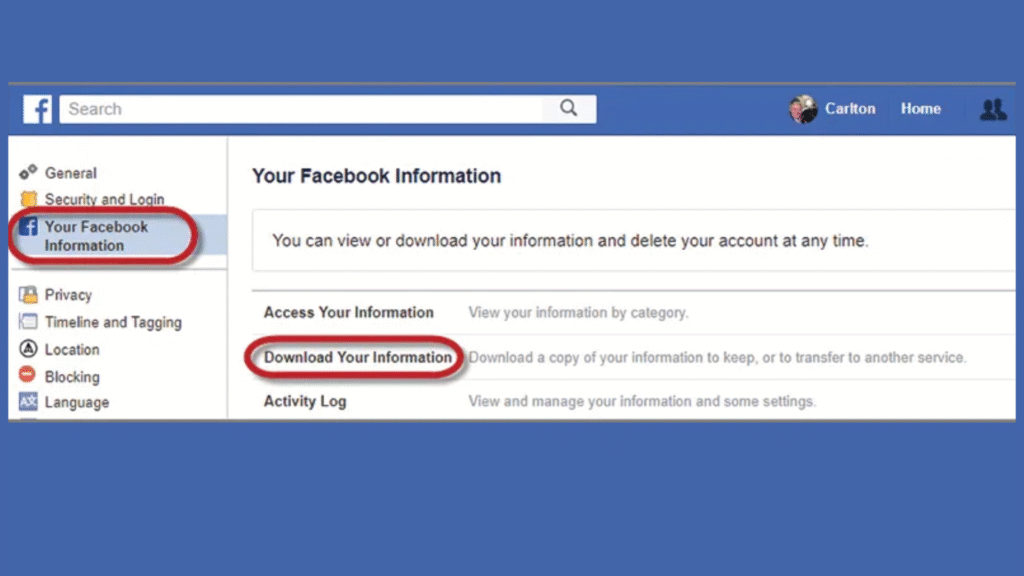
Here’s how to back up your data:
- Go to Settings & Privacy → Settings.
- Click Your Facebook Information.
- Select Download Your Information.
- Choose the type of data (posts, photos, videos, messages, etc.).
- Select Date Range and Format (HTML or JSON).
- Click Create File.
Facebook will prepare your file and notify you when it’s ready to download.
What Happens After Deleting Your Facebook Account?
Many people wonder what happens when they hit that “Delete” button.
- Your account becomes invisible immediately.
- Facebook gives you a 30-day grace period in case you change your mind.
- After 30 days, all posts, photos, and activity are permanently removed.
- Some data (like messages you sent to friends) may remain visible to them.
- Access to apps linked with Facebook (like Spotify or Pinterest) will be removed unless you change login settings.
Life After Facebook: Tips to Move Forward
Deleting Facebook may feel strange at first, but here are ways to adjust:

1. Replace Facebook with Healthier Habits
Instead of endless scrolling, try reading, exercising, or journaling.
2. Stay Connected Elsewhere
Use WhatsApp, Telegram, or email to keep in touch with family and friends.
3. Join Communities Outside Facebook
Look for forums, hobby groups, or local meetups that match your interests.
4. Focus on Real-Life Relationships
Deleting Facebook often frees time to invest in personal connections.
Common Questions About Deleting Facebook
Q1: Can I reactivate after deleting?
- No, once the 30-day grace period is over, your account is permanently gone.
Q2: What if I only want a break?
- In that case, choose deactivation instead of deletion.
Q3: Can I delete Facebook but keep Messenger?
- No, deleting Facebook also removes Messenger.
Q4: Will deleting my account remove Facebook data from the internet?
- Some data (like shared messages or posts copied by others) may remain.
Pros and Cons of Deleting Facebook
Pros:
- More privacy
- Less distraction
- Improved mental health
- Better productivity
- Freedom from negativity
Cons:
- Losing touch with Facebook-only friends
- No access to Facebook groups or pages
- Harder to log into apps linked with Facebook
- Memories and old photos gone
Final Thoughts
Deleting Facebook is a deeply personal decision. For some, it feels like gaining freedom; for others, it feels like losing an important social connection. The key is to make a thoughtful choice. If you’re not fully ready, try deactivation first. If you’re certain, follow the steps outlined here and move forward with confidence.
Are you planning to delete your Facebook account, or will you just deactivate it for now? Share your thoughts in the comments below!

A slow or unreliable Wi-Fi connection can be extremely frustrating especially when you are working from home, streaming your favorite show, gaming online, or trying to attend an important video conference. The good news? Most Wi-Fi issues are easy to fix without needing a technician. With the right troubleshooting steps, you can restore your internet speed, strengthen your signal, and enjoy smooth connectivity.
In this blog, we’ll explore the most common Wi-Fi problems and provide simple, practical solutions you can apply right away.
1. Restart Your Router and Modem
Sometimes the simplest fix is the most effective. Restarting the router clears temporary glitches and refreshes your connection.
How to do it:
- Turn off the router and modem.
- Unplug them for 20–30 seconds.
- Plug them back in and wait for all lights to stabilize.
This quick reset often boosts speed and fixes disconnections.
2. Check the Position of Your Router
Where you place your router can make a huge difference in Wi-Fi strength.
Best placement tips:
- Keep it in the center of your home.
- Avoid placing it near walls, metal surfaces, or appliances.
- Elevate the router placing it on a shelf works great.
- Don’t hide it inside a cabinet.
Physical obstacles significantly weaken signals, so proper positioning matters.
3. Reduce Wi-Fi Interference
Some household devices may disrupt your Wi-Fi signals.
Common sources of interference include:
- Microwave ovens
- Bluetooth devices
- Baby monitors
- Wireless speakers
- Cordless phones
If any of these are near your router, consider relocating them to minimize signal conflict.
4. Forget and Reconnect Your Wi-Fi Network
If a specific device is having trouble, the saved Wi-Fi settings on that device might be corrupted.
Steps:
- Go to your device’s Wi-Fi settings.
- Select your network.
- Tap Forget Network.
- Reconnect using the Wi-Fi password.
This refreshes the connection and often fixes authentication issues.
5. Update Your Router’s Firmware
Routers need updates just like computers and phones.
Why update?
- Fixes bugs
- Improves speed
- Enhances security
- Reduces connection drops
How to update:
- Log in to your router’s admin panel (usually 192.168.0.1 or 192.168.1.1).
- Check for Firmware Update settings.
- Install any available updates.
Updating regularly gives your Wi-Fi better performance.
6. Check How Many Devices Are Connected
If too many devices (phones, laptops, TVs, smart appliances) are sharing one network, your speed may drop.
What to do:
- Disconnect devices not in use.
- Limit heavy usage like 4K streaming or online gaming on peak hours.
- Consider upgrading your plan if you have many users.
Even high-speed internet slows down when overloaded.
7. Change Your Wi-Fi Channel
Other nearby routers especially in apartments may be using the same Wi-Fi channel.
Fix:
Log into your router settings and switch to a less crowded channel.
Channels 1, 6, or 11 are usually the most stable for the 2.4GHz band.
8. Switch Between 2.4GHz and 5GHz Bands
Most modern routers are dual-band.
2.4GHz advantages:
- Longer range
- Works better through walls
5GHz advantages:
- Faster speeds
- Less interference
If your speed is slow but your range is good, try 5GHz.
If your connection is dropping, try 2.4GHz.
9. Run a Speed Test
A speed test shows whether the problem is your Wi-Fi or your internet provider.
You can use:
- Speedtest.net
- Google: “internet speed test”
- Fast.com
If your speed is far lower than what you’re paying for, the issue may be with your ISP.
10. Reset Your Router to Factory Settings
If all else fails, a full reset gives your router a fresh start.
How to reset:
- Find the reset button on the router.
- Hold it for 10–15 seconds using a pin.
- Reconfigure your Wi-Fi name and password.
Warning: This will erase all custom settings.

11. Consider Getting a Wi-Fi Extender or Mesh System
If your home has dead zones, weak signal spots, or thick walls, you may need additional hardware.
Options:
- Wi-Fi extenders: Boost the signal to far corners.
- Mesh systems: Provide even coverage throughout your home.
These upgrades greatly improve speed and stability.
12. Contact Your Internet Service Provider (ISP)
If none of the above fixes work, your ISP may be experiencing:
- Line issues
- Outages
- Overloaded networks
- Router incompatibility
Ask for a technician or request an upgraded router.
Conclusion
Wi-Fi problems can interrupt your routine, but most of them are easy to fix. By restarting your router, placing it correctly, reducing interference, updating firmware, limiting device overload, switching bands, and performing simple diagnostics, you can restore your internet connection quickly.
With the right setup and a few smart adjustments, you can enjoy faster, more reliable Wi-Fi at home whether you’re working, studying, gaming, or streaming.

Introduction
Do you have unused gift cards sitting in your drawer? You’re not alone and How to Sell Gift Cards . Millions of people receive gift cards every year and never use them. Whether it’s for a brand you don’t shop at, a store that doesn’t exist nearby, or just a card you forgot about, there’s a simple solution sell your gift cards for cash.
In this complete guide, you’ll learn how to sell gift cards safely and smartly, both online and offline. We’ll cover the best websites, trusted apps, step-by-step instructions, and practical tips to get the highest payout possible.
By the end, you’ll know exactly how to convert unwanted gift cards into real money in your pocket.
Why Should You Sell Gift Cards?
Gift cards are great gifts, but sometimes they’re simply not useful. Here are the most common reasons people sell them:
- You received a card for a brand you don’t use.
- The nearest store is far away or doesn’t exist in your country.
- You need quick cash.
- You already have multiple cards for the same brand.
- The remaining balance is small and you’d rather have cash.
Whatever the reason, learning how to sell gift cards can help you unlock the hidden money that would otherwise go to waste.
Types of Gift Cards You Can Sell
1. Physical Gift Cards
These are the traditional plastic cards you get from stores or friends. You can sell them in person, at kiosks, or by mailing them to resale websites.
2. eGift Cards (Digital Gift Cards)
These are digital versions sent through email or apps. They’re faster and easier to sell since you just need to provide the code.
Best Places to Sell Gift Cards Online
Selling online gives you the best return because of competitive pricing and a wider buyer base. Here are some of the top-rated websites and apps to sell your gift cards safely:
| Platform | Type | Payment Methods | Payout Speed |
|---|---|---|---|
| Raise | Marketplace | PayPal, Direct Deposit | When the card sells |
| CardCash | Direct Resale | PayPal, Check, ACH | 1–3 days |
| GiftCash | Instant Buy | Bank Transfer, Crypto | 1–5 days |
| ClipKard | Resale | PayPal, Check | 2–10 business days |
| Gameflip | Marketplace | PayPal, Skrill, Bitcoin | When the card sells |
| eBay | Auction/Direct | Buyer’s Payment | After sale completion |
Tip: Compare offers on two or three websites before selling. Prices can vary up to 20%.
Step-by-Step Guide: How to Sell Gift Cards
Step 1: Check the Balance
Before you sell, always confirm the exact balance.
- Visit the brand’s official website.
- Call the toll-free number on the back of the card.
- Use online tools like GiftCardGranny to check balances.
Step 2: Choose the Right Platform
Decide how you want to sell:
- Online resale websites – higher payouts but slower.
- Kiosks or in-person buyers – faster cash but lower value.
- Social media/local selling apps – quick but risky.
Step 3: Create an Account
Sign up on your chosen platform and verify your email or phone number. Add your payment details such as PayPal or bank account.
Step 4: List or Submit Your Card
- Enter the brand, card number, and PIN.
- Upload a clear photo if it’s a physical card.
- Set your price or accept the platform’s offer.
Step 5: Deliver Your Card
- For eGift cards: Send the digital code via the platform.
- For physical cards: Mail them securely using the provided instructions.
Step 6: Receive Payment
Once verified, you’ll get your money through your selected payment method PayPal, bank transfer, or check.

How Much Can You Earn?
Your payout depends on brand popularity, card value, and platform. Here’s a general idea:
| Brand | Typical Resale Value |
|---|---|
| Amazon | 85–92% of card value |
| Walmart | 80–88% |
| Target | 75–85% |
| Starbucks | 70–80% |
| Sephora | 60–75% |
| Niche Stores | 40–60% |
Pro Tip: Sell cards for popular stores and online retailers for higher returns.
Selling Gift Cards In-Store
If you prefer offline methods, here are two options:
1. Gift Card Exchange Kiosks
These machines (often in malls or grocery stores) give instant cash or store vouchers for your gift card.
Pros: Fast and convenient.
Cons: Lower payouts (around 50–70% of value).
2. Local Pawn Shops or Retail Stores
Some pawn shops and independent retailers buy gift cards directly. Just ensure they’re legitimate businesses.
How to Sell Gift Cards Safely
Safety is key when selling gift cards. Here’s how to protect yourself:
- Never share card numbers or PINs before receiving payment.
- Use secure and verified selling platforms.
- Avoid buyers asking for screenshots or verification codes.
- Read reviews before using any website or app.
- For in-person deals, meet in public places and bring someone with you.
How to Get the Highest Value When Selling
Here are proven tips to get the most money for your gift cards:
- Sell during peak seasons like holidays or back-to-school time.
- Use marketplaces (like Raise) instead of instant-buy sites for better rates.
- Keep cards in good condition. No scratches or missing codes.
- Act fast. The longer you wait, the less value you may get.
- Compare multiple offers before accepting one.
Can You Sell Partially Used Gift Cards?
Yes, most resale platforms accept cards with partial balances. Just make sure to:
- Know the exact remaining amount.
- Provide the full card number and PIN.
- Verify your balance before listing.
Is It Legal to Sell Gift Cards?
Absolutely. Selling gift cards is 100% legal as long as:
- The card was originally purchased legitimately.
- You’re not selling stolen or fraudulent cards.
- You follow each platform’s rules.
So, as long as your card is genuine, you’re safe to sell it.
Common Mistakes to Avoid
- Selling on unverified websites.
- Mailing cards without tracking.
- Accepting lowball offers too quickly.
- Sharing codes before payment confirmation.
Avoiding these mistakes will save you from scams and ensure you get the best payout possible.
Alternatives to Selling Gift Cards
If you don’t want to sell, here are other smart ways to use your gift cards:

- Exchange them for another brand using platforms like Card Cash.
- Trade with friends or family.
- Donate to charity for tax benefits.
- Shop and resell the products for cash profit.
FAQs About How to Sell Gift Cards
1. Can I sell Visa or Mastercard gift cards?
Yes, most resale websites accept prepaid Visa or Mastercard gift cards.
2. How long does payment take?
Anywhere from a few hours to 5 business days, depending on the site and payment method.
3. Do I need the receipt?
Usually not, but some platforms may ask for proof if the balance is high.
4. Can I sell international gift cards?
Some websites only accept cards from specific regions (like the U.S. or Canada), so check before listing.
5. Is selling used or partially used cards allowed?
Yes, as long as you accurately declare the remaining balance.
Conclusion
Selling gift cards is one of the easiest ways to turn unused value into real money. Whether you use online marketplaces like Raise and CardCash or go with quick local options like kiosks, the process is simple and rewarding.
Now that you know how to sell gift cards, take a few minutes to check your unused cards, compare platform rates, and make your first sale today. With a little effort, you can easily convert forgotten gift cards into useful cash and never let free money go to waste again.
How-To Tutorials & Troubleshooting
How to Write a Check: A Complete Step-by-Step Guide for Beginners

In today’s digital age, online banking, credit cards, and mobile wallets are widely used. Still, writing a check remains an important financial skill. Many landlords, schools, small businesses, or government offices still accept or even prefer checks. Whether you’re opening a bank account for the first time or simply need a refresher, this guide will help you understand how to write a check clearly and correctly.
This article explains every part of a check, step-by-step instructions, common mistakes to avoid, safety tips, and a sample check. Even if checks seem old-fashioned, knowing how to write one is essential for financial literacy.
Why Do People Still Use Checks?
Even though digital payment systems are fast and convenient, checks are still used across many countries for several reasons:
- Checks provide written proof of payment.
- They are useful for large transactions without carrying cash.
- Many landlords, utility companies, and schools still accept checks.
- In some countries, checks are the main method for business payments.
- They can be post-dated to schedule payments in the future.
So, learning this simple skill can save you from confusion in many situations.
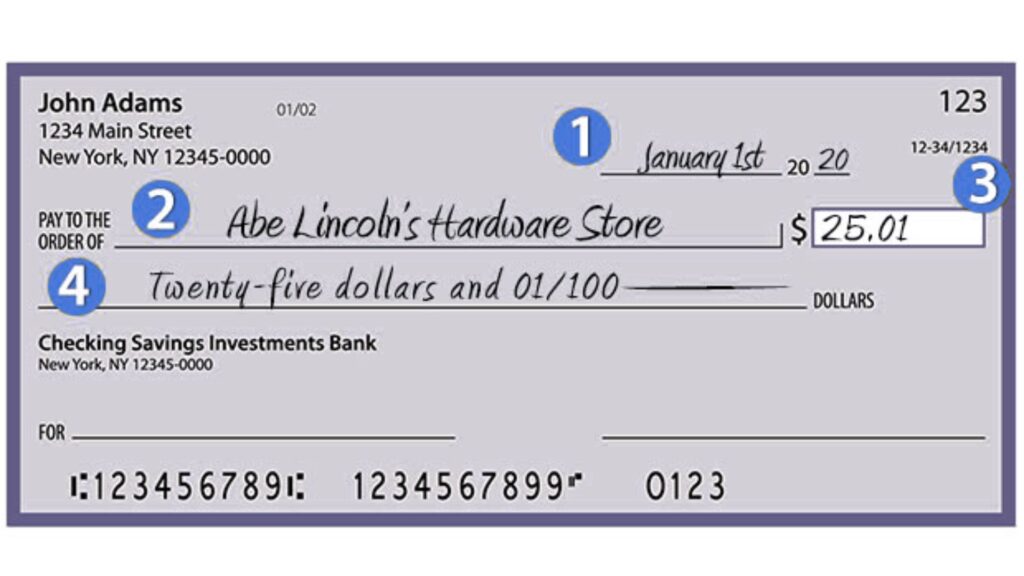
Parts of a Check You Need to Know
Before you start writing a check, it’s important to understand every field on it. While designs differ from country to country, most checks include the following parts:
1. Date Line
This is where you write the date when the check is issued. It can be written in different formats depending on your country, such as:
- 20 October 2025
- 10/20/2025
- 20/10/2025
2. Payee Name Line
Here, you write the name of the person, company, or organization that will receive the money. You can write:
- A personal name (e.g., John Smith)
- A business name (e.g., City Water Services)
- Yourself, if you are writing a check to withdraw money
3. Amount in Numbers
This box or small line is where you write the amount in numbers, for example, 250.00 or 1,500.50.
4. Amount in Words
This line is very important because the amount written in words is legally considered the official payment amount. For example:
- Two hundred fifty dollars and 00 cents
- One thousand five hundred rupees only
Writing the amount in words prevents anyone from secretly adding extra numbers.
5. Memo or For Line
This section is optional. You can write why the check is being given, such as:
- Rent for October
- Payment for school books
- Invoice No. 4567
6. Signature Line
This is where you sign the check. Without your signature, the bank will not process the payment.
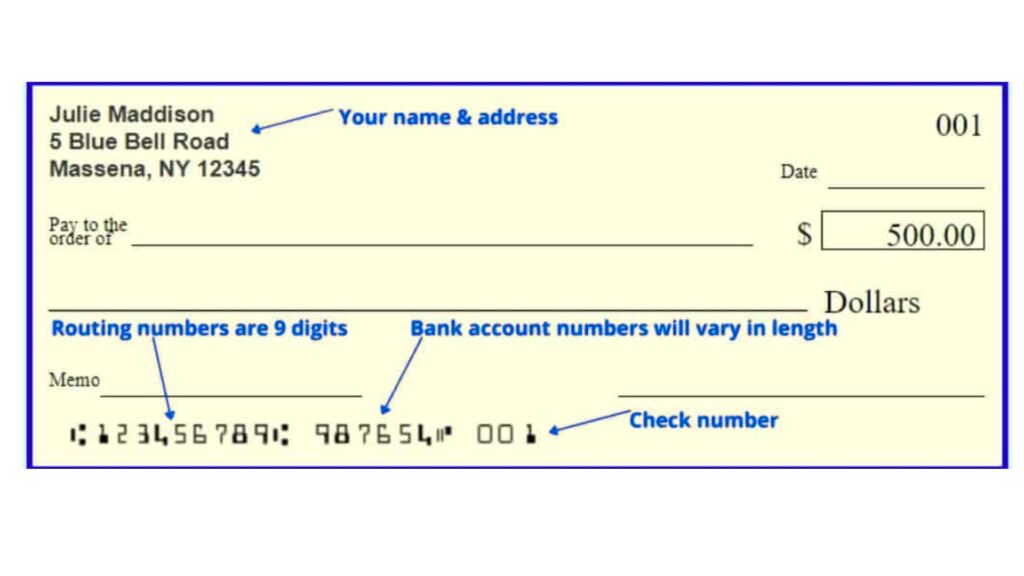
7. Bank Information and Account Details
At the bottom of the check, there are printed numbers that include:
- Your bank’s routing or branch code
- Your account number
- The check number
These numbers help the bank process your payment.
Step-by-Step: How to Write a Check
Now that you understand the parts of a check, let’s go through each step clearly.
Step 1: Write the Date
Use the correct format based on your country, such as DD/MM/YYYY or MM/DD/YYYY. Always write the full date, not just the month and year. You can also post-date a check if you want the payment to be processed later.
Example: 26 October 2025
Step 2: Write the Payee Name
Write the full name of the person or company receiving the money. Make sure the name is spelled correctly and clearly. If you are unsure of the exact name of a business, check their invoice or receipt.
Example: Green Valley School
Step 3: Write the Amount in Numbers
In the small box, write the exact amount using digits. Include decimals even if it’s a whole number.
Example: 3500.00
Step 4: Write the Amount in Words
On the longer line, write the amount in words. Start writing from the far left side to prevent anyone from adding extra words. Use the word “only” at the end if no cents or paisa are included.
Example: Three thousand five hundred dollars only
Step 5: Fill in the Memo Line (Optional)
You can skip this part if you want. But adding a description helps you and the payee keep records.
Example: School fee for November
Step 6: Sign the Check
Use the same signature that your bank has on file. If the signatures do not match, your bank may reject the check.
Sample Check Format
Date: 26 October 2025
Pay to the Order of: Green Valley School
Amount in Numbers: 3,500.00
Amount in Words: Three thousand five hundred dollars only
Memo: School fee for November
Signature: [Your Name]
Common Mistakes People Make While Writing a Check
- Leaving blank spaces that allow others to add extra words or numbers.
- Incorrect spelling of the payee’s name.
- Writing the wrong date or forgetting the year.
- Writing different amounts in numbers and words.
- Forgetting to sign the check.
- Using pencil instead of pen. A check should always be written in pen.
- Damaging or tearing the check, which may cause it to be rejected by the bank.
How to Cancel or Void a Check
If you make a mistake, don’t panic. Just write the word “VOID” across the entire check. Then tear it or keep it safely so no one else uses it. Never throw a voided check in the trash without destroying it.
Safety Tips for Writing Checks
- Always keep your checkbook in a safe place.
- Never leave empty spaces in the amount lines. Draw a line after writing the value.
- Do not pre-sign blank checks.
- Use dark-colored ink pens to avoid someone washing and rewriting the check.
- Regularly check your bank statements to ensure no unauthorized checks have been cashed.
- If a checkbook is lost or stolen, immediately report it to your bank.
What Happens After You Write a Check?
When you give someone a check:
- The payee deposits it in their bank.
- The bank sends the check to your bank for approval.
- Your bank verifies your signature, available balance, and account details.
- If everything is correct, the money is deducted from your account and transferred to the payee’s bank account.
This process may take a few hours or several days, depending on the country and banks involved.
Frequently Asked Questions
Can I write a check to myself?
Yes. Write your own name as the payee. You can then deposit the check in another account or cash it.
What if I make a mistake?
Simply write “VOID” across the check and write a new one.
What is a post-dated check?
A post-dated check is written with a future date. The bank will only process it on or after that date.
What does “Not Negotiable” mean on a check?
It means the check cannot be transferred to another person and can only be paid to the person whose name is written on it.
Can I use correction fluid (white-out) on a check?
No. Banks usually reject checks with any signs of correction. It’s better to void the check and write a new one.
Final Tips to Remember
- Always write neatly and clearly.
- Keep a record of every check you write.
- Double-check the date, payee name, and amount before signing.
- Never share your checkbook or bank details unnecessarily.
- When in doubt, ask your bank for guidance.


How to Remove a Virus from Android (Complete Guide 2026)

Spring/Summer 2026 Fashion Trends You Can Shop Now

How to Detect and Remove Spyware From an Android Phone 2026


-

 Fashion6 months ago
Why ’90s Fashion Still Dominates Today’s Style Scene
-

 Fashion6 months ago
Top Fashion Trends to Follow in August 2025
-

 How-to Guides6 months ago
How to Restore Pantone Colors in New Illustrator Versions (2026 Guide)
-

 Politics5 months ago
Reddit Politics: A Deep Dive into Online Political Discourse
-

 How-To Tutorials & Troubleshooting5 months ago
How to Screenshot on Mac: The Complete 2025 Guide