
How-To Tutorials
How to delete a Facebook Account Guide 2026
Introduction
Thinking about leaving social media for good? If you’re searching for how to delete a Facebook account, you’re not alone. Many users today want better privacy, fewer distractions, and more control over their digital footprint. Whether you use Facebook account settings, the permanently delete Facebook account option, or explore Facebook deactivation vs deletion, understanding the difference matters. You can remove your profile through the Facebook privacy settings page on desktop or mobile. However, before you proceed, it’s smart to download your data and review linked apps. In this guide, you’ll learn the safest and quickest way to delete Facebook account permanently without confusion or regret.
How to Delete a Facebook Account Permanently on Desktop and Mobile
Ready to move forward? Let’s walk through how to delete a Facebook account using simple steps. The process works similarly on desktop and smartphone. However, menus may look slightly different depending on updates.
Step-by-Step Method (Desktop)
- Log into your account.
- Click your profile picture in the top right corner.
- Open Settings & Privacy.
- Select Facebook account settings.
- Choose Your Facebook Information.
- Click Deactivation and Deletion.
- Select Permanently Delete Account.
- Confirm using your password.
After confirmation, your account enters a 30-day deletion period. During this time, logging back in cancels the request.
Step-by-Step Method (Mobile App)
- Open the Facebook app.
- Tap the menu icon.
- Scroll to Settings & Privacy.
- Tap Account Ownership and Control.
- Select Deactivation and Deletion.
- Choose Delete Facebook account permanently.
- Confirm and submit.
That’s it. The process is surprisingly simple once you know where to click.
Facebook Deactivation vs Deletion: Understand the Difference
Confused about which option to choose? You’re not alone. Many users mix up Facebook deactivation vs deletion. Yet the difference is huge.
| Feature | Deactivation | Permanent Deletion |
|---|---|---|
| Profile visibility | Hidden temporarily | Removed forever |
| Messenger access | Still usable | Deleted |
| Data recovery | Yes | No |
| Linked apps | Still connected | Disconnected |
| Reversal option | Anytime | Only within 30 days |
Deactivation works like putting your account to sleep. Deletion works like shredding the file. If you simply need a break, deactivation is safer. However, if privacy is your priority, permanent deletion makes sense.
Download Your Data Before You Delete
Before you finalize how to delete a Facebook account, protect your memories. Photos, videos, comments, and messages disappear after deletion. Therefore, download your archive first.
Here’s how:
- Go to Your Facebook Information
- Click Download Your Information tool
- Choose data format (HTML or JSON)
- Select media quality
- Request file
Facebook will notify you when your file is ready. Then you can store it safely on your device or cloud storage. Think of it like packing your suitcase before leaving home forever.
What Happens After You Delete Facebook?
Curious about what changes? Once you confirm delete Facebook account permanently, several things happen.
First, your profile becomes invisible. However, your data remains on Facebook servers during the 30-day grace period. After that, permanent removal begins. Some residual logs may stay for legal reasons. Still, your personal profile vanishes from public view.
Also, linked accounts may stop working. For example:
- Spotify logins via Facebook may fail
- Instagram connected accounts may disconnect
- Third-party games lose access
Therefore, review linked services before deleting. It prevents surprises later.
Common Problems When Deleting Facebook
Sometimes, users face issues during the deletion process. Don’t panic. Most problems are minor.
Login Errors: Reset your password first.
Missing Delete Option: Update the app.
Deletion Cancelled: Avoid logging in during the 30-day window.
If needed, visit Facebook Help Center for clarification. However, most users complete the process without difficulty.
Should You Delete Facebook in 2026?
That depends on your goals. Social media connects people. Yet privacy concerns keep growing. If you feel overwhelmed, stepping away can feel refreshing. Some users report better focus and reduced stress after deleting accounts.

However, consider alternatives. You can:
- Adjust Facebook privacy settings page controls
- Limit ad personalization
- Reduce friend visibility
- Remove old posts
Sometimes, cleaning your account works better than deleting it entirely.
Quick Recap: How to Delete a Facebook Account
Let’s summarize clearly:
- Visit Facebook account settings
- Select Deactivation and Deletion
- Choose Delete Facebook account permanently
- Confirm password
- Wait 30 days
Simple steps. Big decision.
Click here how to take screenshot on windows
How to Know If You Can Get Back a Deleted Facebook Account (7 Clear Steps)
Is Your Facebook Account Compromised? A Deep-Dive Guide to Spot Hidden Takeovers
Final Thoughts
Deciding how to delete a Facebook account is personal. Some people want digital minimalism. Others want stronger privacy control. Whatever your reason, now you understand the exact steps. You know the difference between temporary pause and permanent removal. You know how to secure your data before leaving.
FAQ
1. How do I permanently delete my Facebook account?
Go to Settings & Privacy → Settings → Your Facebook Information → Deactivation and Deletion, then choose Delete Account.
Confirm your password, submit the request, and avoid logging in for 30 days to complete permanent deletion.
2. How do I delete one of my accounts on Facebook?
Log into the specific account you want removed, then access Account Ownership and Control in settings.
Select Deactivation and Deletion, choose Permanently Delete Account, and confirm.
3. How do I permanently delete a second Facebook account?
Sign in to the second account separately since each profile must be deleted individually.
Follow the same deletion steps under Your Facebook Information, then confirm and wait 30 days.
4. How do I permanently delete my Facebook account in 2026?
In 2026, the process remains under Settings → Deactivation and Deletion → Delete Account.
Download your data first, confirm deletion, and do not log back in during the 30-day grace period.

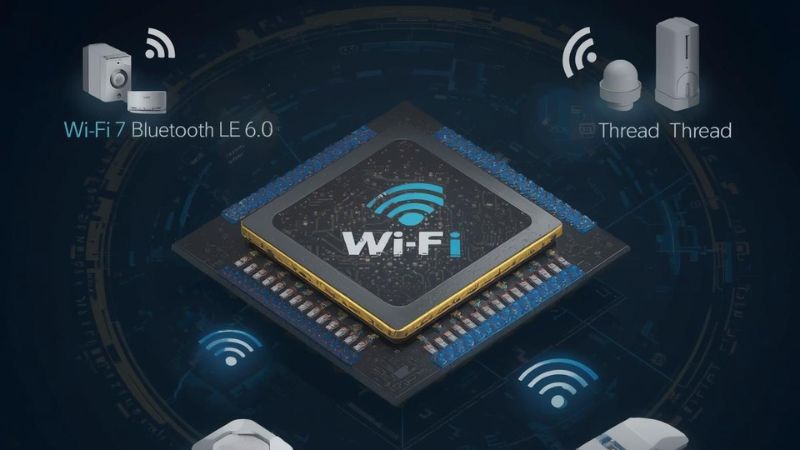
The latest Wi-Fi 7 News is transforming the way IoT devices connect in homes, offices, and industries across the USA. Infineon’s tri-radio IoT chip integrates Wi-Fi 7, Bluetooth LE 6.0, and IEEE 802.15.4 Thread, providing a compact, low-power solution for battery-powered devices. With support for 20 MHz-only Wi-Fi 7, adaptive band switching, and multi-protocol edge nodes, this innovation ensures reliable connectivity even in congested network environments. Smart home gadgets, industrial sensors, and commercial IoT systems can now achieve longer battery life, deterministic behavior, and enhanced contextual awareness. This breakthrough marks a significant step toward the next generation of low-power IoT connectivity.
Wi-Fi 7 IoT Devices: Low-Power Tri-Radio Connectivity
The ACW741x chip marks a major milestone in low-power IoT connectivity. Designed for devices that rely on batteries, it supports 20 MHz-only Wi-Fi 7 operation, which reduces interference in crowded network environments.
Key Features Include:
- Tri-radio integration: Wi-Fi 7, Bluetooth LE 6.0, IEEE 802.15.4 Thread
- Ultra-low standby power: Up to 15x lower than previous IoT Wi-Fi products
- Multi-Link Wi-Fi: Works on 2.4, 5, and 6 GHz bands
- Smart home and industrial readiness: Optimized for congested environments
This chip allows devices such as door locks, cameras, thermostats, and other battery-powered IoT devices to last longer while maintaining constant connectivity. For example, a smart lock powered by ACW741x could operate for years without changing its battery.
Transition Insight: Notably, adaptive band switching reduces network congestion. This is especially useful in busy households or commercial spaces with dozens of connected devices.
Why 20 MHz Wi-Fi 7 Matters
Wi-Fi 7 usually focuses on high-speed data. However, IoT devices require low-power and reliable links, not maximum throughput. Supporting 20 MHz-only operation makes devices more efficient.
Advantages of 20 MHz Wi-Fi 7:
- Reduced energy consumption for battery-powered devices
- Improved connectivity in crowded networks
- Better reliability for multi-protocol edge nodes
- Compatibility with Wi-Fi CERTIFIED 7 standards
This shift means Americans can expect smart home devices that last longer, work better, and require fewer frequent updates. Think of thermostats that report accurate data all day without draining batteries or cameras that stay connected in smart offices without network issues.
Multi-Protocol Integration for Smarter IoT Networks
The ACW741x goes beyond Wi-Fi. By integrating Bluetooth LE 6.0 with Channel Sounding and IEEE 802.15.4 Thread, the device supports Matter ecosystem connectivity. This means your smart home or industrial setup can communicate smoothly across multiple protocols.
Benefits of Multi-Protocol Integration:
- Seamless connection between different smart devices
- Enables contextual awareness and location-based services
- Simplifies device setup and reduces hardware complexity
- Supports both consumer and industrial IoT nodes
For instance, a smart factory using these devices can track machinery locations in centimeters, thanks to Bluetooth Channel Sounding. Similarly, home automation systems can respond faster to environmental changes by leveraging Wi-Fi Channel State Information (CSI).
Example: Imagine your lights automatically adjusting based on the exact position of your family members, all without draining your battery. That’s the power of tri-radio IoT devices.
Wi-Fi 7 in Congested Environments: Adaptive and Efficient
Wi-Fi networks in the USA are getting crowded. With multiple devices per household, interference is a real problem. The ACW741x chip solves this by supporting adaptive band switching across 2.4, 5, and 6 GHz bands.
Table: Wi-Fi 7 Band Usage
| Frequency Band | Typical Use Case | Benefit |
|---|---|---|
| 2.4 GHz | Smart home devices | Long-range, low energy |
| 5 GHz | Wi-Fi devices & cameras | Faster data, moderate range |
| 6 GHz | High-speed Wi-Fi 7 links | Reduced congestion, high reliability |
This ensures devices work efficiently even in dense apartments, offices, or commercial buildings. Wi-Fi 7 IoT devices now offer deterministic behavior and scheduling efficiency, guaranteeing smooth performance in all scenarios.
Transition Insight: As Kevin Robinson, CEO of Wi-Fi Alliance, says, “The introduction of 20 MHz Wi-Fi 7 IoT solutions unlocks widespread adoption across the IoT market.”
Ecosystem Support and Module Integration
Infineon is collaborating with module partners like Azurewave, Ezurio, Murata, and Quectel. This makes it easier to integrate the ACW741x chip into ready-to-use wireless modules.
Benefits of Ecosystem Support:
- Faster deployment of smart home and industrial IoT devices
- Reduced development costs for startups and manufacturers
- Certified and standardized Wi-Fi 7 performance
- Future-proof devices ready for Matter ecosystem
This approach allows both large companies and small startups in the USA to adopt tri-radio IoT devices quickly, offering better network quality and robust performance.
Impact on Smart Homes and Industrial IoT
With Wi-Fi 7 IoT devices, both consumers and businesses will see tangible benefits.
Smart Home Advantages:
- Reliable always-on connectivity
- Longer battery life for devices
- Easy integration with existing ecosystems
Industrial IoT Advantages:
- Accurate location tracking with centimeter-level ranging
- Deterministic scheduling for real-time operations
- Low-power devices reduce energy costs
In short, this new Wi-Fi 7 news signals the next wave of innovation. From homes to factories, devices will now work smarter, not harder.
Conclusion:
The latest Wi-Fi 7 IoT devices are more than just fast connections. They combine tri-radio integration, low-power operation, and multi-protocol support to transform smart homes, industrial automation, and commercial IoT.
FAQ
1. Is Wi-Fi 7 officially released?
Yes, Wi-Fi 7 was officially launched under the Wi-Fi CERTIFIED 7 program by the Wi-Fi Alliance in early 2024.
Certified routers and devices are now available in the U.S. market.
2. Is Wi-Fi 7 a real thing?
Yes, it is real and based on the IEEE 802.11be standard.
Major tech brands already sell Wi-Fi 7 routers, laptops, and smartphones.
3. Is Wi-Fi 7 faster than 5G?
In ideal indoor conditions, Wi-Fi 7 can deliver higher peak speeds than most 5G home networks.
However, 5G offers wider outdoor coverage while Wi-Fi 7 focuses on local high-speed connectivity.
4. Is Wi-Fi 8 coming?
Yes, research for Wi-Fi 8 (IEEE 802.11bn) is already underway.
It aims to improve reliability, latency, and performance in dense environments.
5. Is there 6G internet?
6G is currently in the research and testing phase worldwide.
Commercial 6G networks are expected around 2030, not yet available today.
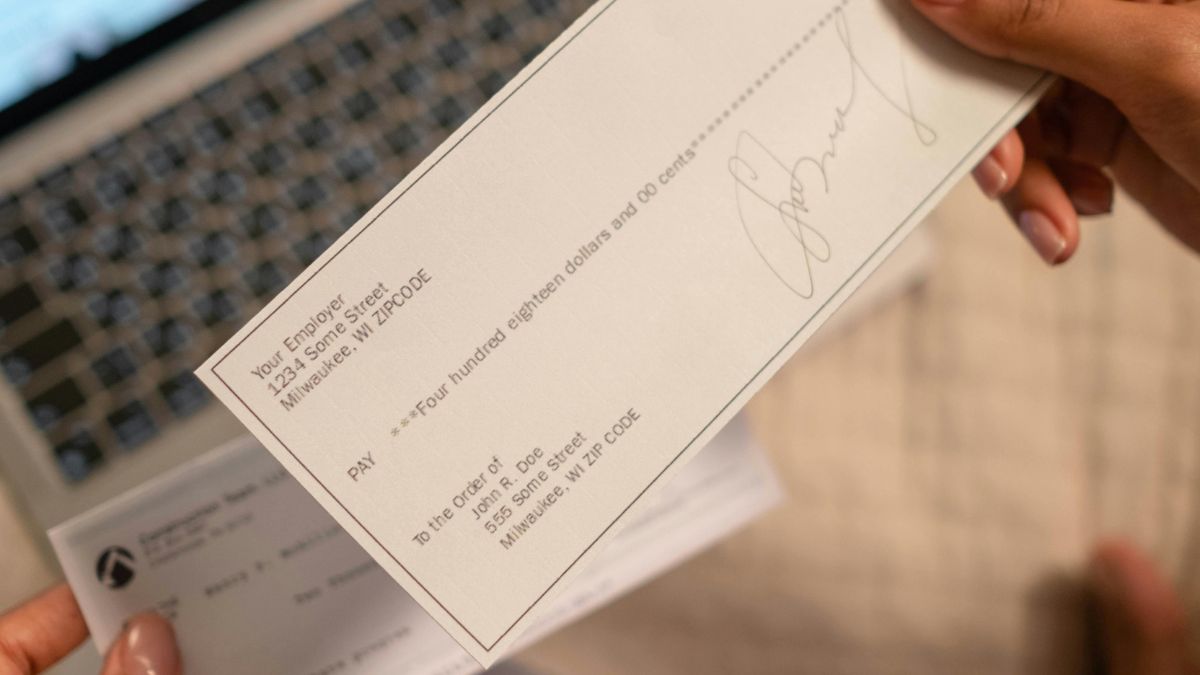
Writing a paper check may feel old school in a world of apps and instant transfers. However many landlords, schools, and small businesses across the United States still accept them every day. If you have ever paused with pen in hand wondering how to write a check, you are not alone. The process looks formal, yet it follows a simple pattern once you understand it. Learning how to fill out a check correctly protects your money and prevents errors. From adding cents to knowing where to sign a check, each step matters. This quick guide to check writing instructions will help you feel calm, careful, and confident.
How to Write a Check: Step-by-Step Instructions and Examples
Although checks look formal, they follow a predictable structure. Once you understand the layout, you can handle any personal check example with confidence. Let us walk through the process carefully.
Step 1: Write the Date
First look at the top right corner. Write today’s date clearly. This confirms when the payment begins processing. Banks rely on dates for signature verification banking and fraud screening.
For example: March 4 2026.
Never postdate unless necessary. Doing so may create confusion.
Step 2: Add the Payee
Next move to “Pay to the order of.” Here you write the full legal name of the recipient. This step defines who can legally deposit the check.
If you are paying rent, write the landlord or company name exactly as instructed. This answers the common question of how to write a check for rent correctly.
Avoid leaving this blank. Also avoid casual shortcuts. Precision matters in checking account management.
Step 3: Write the Amount in Numbers
Now shift to the small box on the right. Enter the amount in digits. Example:
$850.75
Write clearly. Avoid scribbles. This numeric value must match the written words below. Many people ask how to write dollars and cents on a check. The key is accuracy and legibility.
Step 4: Write the Amount in Words
Below the payee line you spell out the amount. For instance:
Eight hundred fifty and 75/100
If there are no cents write 00/100. This clarifies the total. Knowing how to write a check with cents prevents rejection by the bank.
Draw a line after the words to block alterations. This small action supports check fraud prevention tips and strengthens security.
Step 5: Fill in the Memo Line
Although optional, the memo line is helpful. It explains the purpose of payment. Understanding the check memo line meaning improves record tracking.
Examples:
- April Rent
- Invoice 1023
- Tuition Payment
Businesses often request account numbers here. Therefore include requested details carefully.
Step 6: Sign the Check
Finally sign the bottom right corner. Use your official bank signature. This step authorizes payment. Without it the check is invalid.
If you wonder where to sign a check, always look at the lower right front side. The back is reserved for endorsements.
Quick Reference Table
| Section | What to Enter | Why It Matters |
|---|---|---|
| Date | Current date | Confirms timeline |
| Payee | Full legal name | Identifies recipient |
| Amount Box | $850.75 | Numeric clarity |
| Amount Line | Eight hundred fifty and 75/100 | Legal confirmation |
| Memo | April Rent | Tracking purpose |
| Signature | Your official signature | Authorizes payment |
Avoiding Common Check Mistakes
Even careful people slip. However you can prevent most issues with simple awareness.
Never ask “can I write a check in pencil?” The answer is no. Pencil invites tampering. Always use blue or black ink.
If you make an error do not scratch it out. Instead learn how to correct a mistake on a check by voiding it. Write VOID across the front clearly. Record the number in your register.
Also understand how to make a check payable to cash. While legal it is risky. Anyone holding it may deposit it.
If paying two people you must know how to write a check to two people properly. Use “and” if both must sign. Use “or” if either may sign.
How to Endorse and Deposit a Check
Writing is only half the journey. You must also know how to endorse a check and deposit it correctly.
To endorse:
- Turn the check over.
- Sign inside the endorsement area.
If transferring it learn how to sign over a check to someone else. Write “Pay to the order of” followed by their name below your signature.
Next consider deposit options. Many banks offer mobile solutions. The mobile check deposit process allows you to snap photos using your banking app. Follow the mobile banking check deposit guide provided by your bank.
Alternatively visit an ATM. Follow posted ATM check deposit instructions carefully.

Check Expiration and Validity
Checks do not last forever. Many banks follow check expiration rules that limit validity to 180 days. Therefore ask yourself how long are personal checks valid before issuing older stock.
If a check sits uncashed too long contact the recipient. Otherwise funds may remain tied up unnecessarily.
How do you balance a checkbook?
Digital banking is convenient. However knowing how to balance a checkbook builds financial discipline. Think of it as aligning your personal record with your bank’s record.
Each time you write a check record it immediately. Strong check register record keeping prevents overdraft surprises.
Steps to Balance Properly
- Record every check number.
- Subtract payments promptly.
- Add deposits immediately.
- Compare totals with your statement.
- Adjust for outstanding checks.
Many people use a balancing a checking account worksheet for clarity. This worksheet lists deposits, withdrawals, and differences clearly.
Knowing how to record checks in register protects you from unnoticed bank fees.
Sample Check Register
| Date | Description | Payment | Deposit | Balance |
|---|---|---|---|---|
| 04/01 | Opening Balance | — | — | $2,000 |
| 04/03 | Check #110 Rent | $850 | — | $1,150 |
| 04/05 | Paycheck | — | $1,200 | $2,350 |
Notice how each entry updates the running balance. This habit strengthens checking account management skills.
Advanced Tips for Smart Check Users
Although checks seem simple, small strategies enhance security.
First apply strong check fraud prevention tips. Avoid leaving blank spaces. Never pre sign blank checks. Store unused checks securely.
Second understand your account features. Some banks offer a checking account without monthly fee while others provide an interest earning checking account. Choose based on your needs.
Third know how to order more checks. Most banks allow you to reorder checks online or reorder checks from bank branches quickly.
Real Life Scenario
Imagine you write a $500 check for home repairs. The contractor delays cashing it. Your mobile app shows a higher balance. However your register reminds you of the pending payment. Because you practiced write a check step by step discipline and recorded it properly you avoid overspending.
That awareness reflects strong financial habits.
Final Thoughts
In a fast digital world paper checks remain relevant. Therefore mastering how to write a check correctly equips you with practical confidence. From understanding how to fill out a check example to following check writing instructions, each detail matters.
Moreover combining writing skills with balancing skills creates complete financial awareness. When you know how to write, endorse, deposit, and track checks you control your money instead of guessing about it.
Checks may seem old fashioned. However financial clarity never goes out of style.
FAQ
1. How to Write a Formal Check / Official Check
Writing a formal or official check is very similar to a personal check, but it is usually used for business, government, or institutional payments. Follow these steps:
- Date the check : write the current date at the top right corner.
- Payee name : write the full legal name of the company, institution, or person receiving the money. Avoid nicknames.
- Amount in numbers : enter the exact amount in the small box, e.g.,
₹2,00,000or$2,000. - Amount in words : spell out the total amount clearly. Example:
- ₹2,00,000 → “Two lakh only”
- $2,000 → “Two thousand and 00/100 dollars”
- Memo line (optional) : include reason for payment like “Invoice #1234” or “Consulting Fee.”
- Sign the check : use your official signature as registered with your bank.
Tip: Always use black or blue ink, avoid pencil, and fill all spaces to prevent alterations.
2. How Do I Write a Cheque / Check-in Correctly?
Whether you call it a “cheque” (common in UK/India) or “check” (US), the steps are similar:
- Start with date.
- Fill the payee’s full name.
- Enter the amount in numbers and words.
- Optional memo line for reference.
- Sign at the bottom right.
Example (Formal, India):
Date: 04/03/2026
Pay to the order of: ABC Pvt Ltd
Amount: ₹2,00,000
Amount in words: Two lakh only
Memo: Invoice 9876
Signature: ____________
3. Is it “2 lakh” or “2 lacs”?
- The correct formal spelling is 2 lakh.
- “Lac” or “lacs” is informal, often used in casual speech, but banks and official documents prefer “lakh.”
4. Key Tips for Writing Official / Formal Checks
- Always write clearly and in a straight line.
- Avoid abbreviations or slang in payee names or amounts.
- Fill the entire line for the amount in words to prevent fraud.
- Double-check numbers and spellings before signing.
- Keep a record in your check register for tracking.

Drawing is one of the oldest forms of human expression, and it continues to inspire creativity in people of all ages. Whether you want to sketch realistic portraits, design cartoons, or simply doodle for fun, learning how to draw is a skill that anyone can develop with practice.
In this article, we’ll cover the step-by-step process of learning to draw, along with useful tips for beginners.
Why Learn to Draw?
Drawing helps improve focus, observation, and creativity. It’s also a relaxing hobby that reduces stress and sharpens imagination. From professional artists to casual learners, drawing offers endless possibilities.
Tools You Need to Start Drawing
Before picking up your pencil, gather some basic supplies:
- Pencils (HB, 2B, or 4B for shading)
- Eraser (soft eraser works best)
- Sketchbook or paper
- Sharpener
Optional: Colored pencils or markers for adding color.
Step-by-Step Guide on How to Draw
1. Start With Basic Shapes
Everything begins with simple forms circles, squares, triangles, and lines. Practice these shapes daily because they are the foundation of complex drawings.
2. Break Objects Into Simple Forms
Look at any object and imagine it as shapes. For example:

- A face = circle + oval
- A house = square + triangle
- A tree = rectangle + circles
3. Sketch Lightly
Begin with soft lines so you can erase and adjust easily. Avoid pressing too hard on the paper.
4. Add Details Slowly
Once your outline looks correct, start adding details like facial features, clothing folds, or textures.
5. Learn Shading Techniques
Shading makes your drawings look realistic. Decide where your light source is, and shade the opposite side for depth. Practice hatching (lines), cross-hatching, and blending with your finger or tissue.
6. Practice Observation
The best artists observe carefully. Try to draw objects around you cups, books, flowers, or even your hand.
7. Draw Regularly
Consistency is key. A few minutes of daily practice improves skills faster than hours of irregular drawing.

Tips for Beginners
- Don’t worry about perfection mistakes are part of learning.
- Use references (photos, real objects, or online tutorials).
- Start with easy subjects before moving to complex ones.
- Keep a sketch diary to track your progress.
Conclusion
Learning how to draw is a journey of patience and practice. With the right tools, techniques, and a consistent routine, anyone can improve their drawing skills. Remember: every great artist was once a beginner. So, pick up your pencil today and start creating!


How to Remove a Virus from Android (Complete Guide 2026)

Spring/Summer 2026 Fashion Trends You Can Shop Now

How to Detect and Remove Spyware From an Android Phone 2026


-

 Blog8 months ago
Why ’90s Fashion Still Dominates Today’s Style Scene
-

 How-to7 months ago
How to Screenshot on Mac: The Complete 2026 Guide
-

 How-to8 months ago
How to Restore Pantone Colors in New Illustrator Versions (2026 Guide)
-

 Blog7 months ago
Reddit Politics in 2026: How Online Political Discourse Shapes Opinions
-

 Blog8 months ago
Top Fashion Trends to Follow in August 2025